目次
getElementsByTagNameとは
| 変数 = document.getElementsByTagName(タグ名); |
getElementsByTagNameは、タグ名(TagName)を指定して要素(HTMLCollection)を取得するメソッドです。
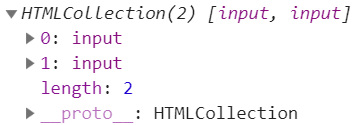
HTMLCollectionのイメージ

HTMLCollectionとは、要素群の集合を表現したインターフェイスです。
指定したタグ名がない場合は、HTMLCollection []を返します。lengthは0です。
メソッドとプロパティを使えます。
https://developer.mozilla.org/ja/docs/Web/API/HTMLCollection
似ている他のメソッド
ID属性がある場合は、getElementByIdで「HTMLCollection」ではなく「要素」を取得できます。
querySelectorやquerySelectorAllであればCSSのセレクタで「要素」を取得できます。
getElementsByTagNameでvalue値を取得する
<input type="text" name="text1" value="red" maxlength="5" />
<input type="text" name="text1" value="blue" maxlength="5" />

<script>
  const textbox1 = document.getElementsByTagName("input");

  for (let i = 0; i < textbox1.length; i++) {
    console.log(textbox1.item(i).value); //red blue
  }
</script>
1,2行目は、<input ・・・があります。
5行目のgetElementsByTagName("input")で1,2行目を取得します。
8行目のitem(i)で1,2行目を分けて取得できます。
get(取得する) + Elements(複数要素) + By + TagName(タグ名によって)です。
value値を取得/設定する+背景色を変える
ボタンを押すとテキストボックス内の文字(value値)が変化し背景色が変わります。
上記サンプルのコードです。
<div id="div1">
  <input type="text" value="赤" maxlength="6" />
  <input type="text" value="赤" maxlength="6" />
</div>
<input type="button" value="変更" onclick="clickBtn1()" />

<script>
  function clickBtn1() {
    const div1 = document.getElementById("div1");
    const input1 = div1.getElementsByTagName("input");

    if (input1.item(0).value === "赤") {
      for (let i = 0; i < input1.length; i++) {
        input1.item(i).value = "青";
        input1.item(i).style.background = "#87CEFA";
      }
    } else {
      for (let i = 0; i < input1.length; i++) {
        input1.item(i).value = "赤";
        input1.item(i).style.background = "rgb(250,128,114)";
      }
    }
  }
</script>
5行目のボタンを押すと8行目の関数を実行します。
10行目の先頭はdocumentではなく、9行目で取得したdiv1です。
getElementsByTagNameメソッドの引数のinputは、2,3行目のinputタグを指します。複数の要素(オブジェクト)を取得します。
14,19行目は、valueに値を設定しています。
文字列の変更+文字列の表示/非表示
ボタンを押すと1行目の文字列が代わり2行目の文字列が表示と非表示で切り替わります。
赤
赤
テスト
上記サンプルのコードです。
<div id="div2">
  <p>赤</p>
  <p>赤</p>
</div>
<div id="div3">
  <p>テスト</p>
</div>
<input type="button" value="変更" onclick="clickBtn2()" />

<script>
  function clickBtn2() {
    const div2 = document.getElementById("div2");
    const p2 = div2.getElementsByTagName("p");
    const div3 = document.getElementById("div3");
    const p3 = div3.getElementsByTagName("p");

    if (p2.item(0).textContent === "赤") {
      for (let i = 0; i < p2.length; i++) {
        p2.item(i).textContent = "青";
        p3.item(i).style.visibility = "hidden"; //非表示
      }
    } else {
      for (let i = 0; i < p2.length; i++) {
        p2.item(i).textContent = "赤";
        p3.item(i).style.visibility = "visible"; //表示
      }
    }
  }
</script>
8行目のボタンを押すと11行目の関数を実行します。
13行目の先頭はdocumentではなく、12行目で取得したdiv2です。
getElementsByTagNameメソッドの引数のpは、2,3行目のpタグを指します。複数の要素(オブジェクト)を取得します。
19,24行目は、textContentに値を設定しています。
20,25行目は、文字列の表示と非表示を設定しています。
関連の記事
JavaScript getElementByIdでIDから値を取得
JavaScript 属性値を取得/設定/削除する(getAttribute)
