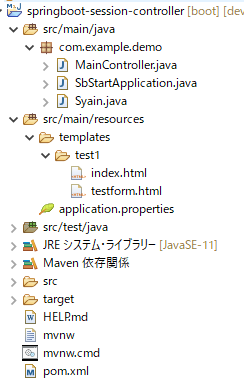
Spring Bootの@SessionAttributesでセッションを使用するサンプルです。
(確認環境:Spring Boot 2.5,JDK 11,thymeleaf3)
目次
| サンプル | @SessionAttributesでセッションを使用する |
| コントローラのクラス(MainController.java) | |
| 値を送信する側のファイル(index.html) | |
| 値を受け取る側のファイル(testform.html) | |
| エンティティのクラス(Syain.java) | |
| 実行して確認する |
@SessionAttributesでセッションを使用する

画面表示時にMainControllerクラスにアクセスし
オブジェクトを生成してセッションに保持します。
画面遷移してもセッションに保持したオブジェクトの値を画面に表示します。
@SessionAttributesの有効範囲は、1つのController内のみです。
以下のURLで確認します。
http://localhost:8765/test1/
以下は、アノテーション型 SessionAttributesのリンクです。
https://spring.pleiades.io/spring-framework/docs/current/javadoc-api/org/springframework/web/bind/annotation/SessionAttributes.html
githubにコードがあります。
https://github.com/ut23405/springboot/tree/master/springboot-session-controller
コントローラのクラス(MainController.java)
package com.example.demo;

import org.springframework.stereotype.Controller;
import org.springframework.ui.Model;
import org.springframework.web.bind.annotation.GetMapping;
import org.springframework.web.bind.annotation.ModelAttribute;
import org.springframework.web.bind.annotation.PostMapping;
import org.springframework.web.bind.annotation.RequestParam;
import org.springframework.web.bind.annotation.SessionAttributes;

/**
 * http://localhost:8765/test1/
 */
@Controller
@SessionAttributes(value = "TestSession")
public class MainController {

	@ModelAttribute(value = "TestSession")
	public Syain createSyain() {
		return new Syain("suzuki");
	}

	@GetMapping("/test1")
	public String input1(@ModelAttribute("TestSession") Syain syain,
			Model model) {
		model.addAttribute(syain);
		return "test1/index";
	}

	@PostMapping("/testform")
	public String output1(@RequestParam String textMemo, Model model,
			@ModelAttribute("TestSession") Syain syain) {
		model.addAttribute(syain);
		model.addAttribute("memo", textMemo);
		return "test1/testform";
	}
}
15行目は@SessionAttributesでセッションにセットする名称を指定しています。
24,32行目は、セッションにセットした名称を指定しています。この箇所を省略するとコンパイルエラーになります。
24行目に来たとき16行目が実行され次に26行目以降が実行されます。
値を送信する側のファイル(index.html)
<!DOCTYPE html>
<html xmlns:th="http://www.thymeleaf.org">
  <head>
    <meta charset="utf-8" />
    <title>submit</title>
  </head>
  <body>
    <form method="post" th:action="@{/testform}">
      <p th:text="${syain.name}"></p>
      <p>メモ:<input type="text" name="textMemo" /></p>
      <input type="submit" value="送信ボタン" />
    </form>
  </body>
</html>
9行目は、オブジェクトの値を表示します。
値を受け取る側のファイル(testform.html)
<!DOCTYPE html>
<html xmlns:th="http://www.thymeleaf.org">
  <head>
    <meta charset="utf-8" />
    <title>submit</title>
  </head>
  <body>
    <p th:text="${syain.name}"></p>
    <p th:text="${memo}"></p>
  </body>
</html>
8行目は、オブジェクトの値を表示します。
エンティティのクラス(Syain.java)
package com.example.demo;

import java.io.Serializable;

public class Syain implements Serializable {
	private static final long serialVersionUID = 1L;
	private String name;

	public Syain(String name) {
		super();
		this.name = name;
	}
	public String getName() {
		return name;
	}
}
9行目はコンストラクタです。
実行して確認する
springbootアプリケーションを起動してブラウザにURL(http://localhost:8765/test1/)を入力するとindex.htmlが画面に表示されます。
※プロジェクトを右クリックしてSpring Bootアプリケーションをクリック。
初期表示時とボタンを押下して別画面遷移後もセッションのオブジェクトの値を表示します。
関連の記事
