Spring5 プロファイルで使用するBeanを切替えるサンプルです。
@Profileアノテーションを使用します。
(確認環境:Spring Boot 2.5,JDK 11)
目次
| サンプル | Spring @Profileで使用するBeanを切替える |
| 1.起動するクラス(StartApp.java) | |
| 2.設定クラス(AppConfig.java) | |
| 3.SyainService,IMessage,Msg1,Msg2 | |
| 実行する | |
| pom.xml |
Spring @Profileで使用するBeanを切替える
処理の流れ
設定クラス(AppConfig.java)にbeanを記述しそれぞれに@Profileのproductと@Profileのtestを設定します。
プログラムの起動時の引数にproductまたはtestを指定して使用するクラスを使い分けます。
githubにコードがあります。
https://github.com/ut23405/spring5/tree/master/spring-Profile
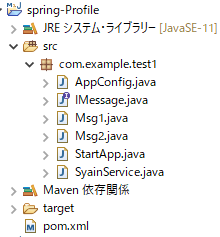
1.起動するクラス(StartApp.java)
package com.example.test1;

import org.springframework.context.annotation.AnnotationConfigApplicationContext;

public class StartApp {
	public static void main(String[] args) {
		AnnotationConfigApplicationContext context =
				new AnnotationConfigApplicationContext(AppConfig.class);
		SyainService syainService = context.getBean(SyainService.class);

		System.out.println(syainService.getMessage()); //設定により変わる

		context.close();
	}
}
11行目は、起動時の引数によって表示されるメッセージが変わります。
2.設定クラス(AppConfig.java)
package com.example.test1;

import org.springframework.context.annotation.Bean;
import org.springframework.context.annotation.Configuration;
import org.springframework.context.annotation.Profile;

@Configuration
public class AppConfig {
	@Bean
	SyainService createService() {
		return new SyainService();
	}
	@Bean
	@Profile("product")
	Msg1 Message1() {
		return new Msg1();
	}
	@Bean
	@Profile("test")
	Msg2 Message2() {
		return new Msg2();
	}
}
@Configurationは、設定クラスであることを示しています。
14,19行目は、Profileアノテーションです。起動時の引数でどちらを使用するか制御できます。
10行目のメソッドは、Profileアノテーションがついていません。この場合は常に起動します。
3.SyainService,IMessage,Msg1,Msg2
SyainService.java
package com.example.test1;
import org.springframework.beans.factory.annotation.Autowired;

public class SyainService {
	@Autowired
	private IMessage iMessage;

	public String getMessage() {
		return iMessage.getMessage();
	}
}
6行目の IMessageはインターフェース型です。
IMessageインターフェースを実装するクラスであれば変数iMessageにインスタンスをセットできます。
IMessage.java
インターフェースです。
package com.example.test1;

public interface IMessage {
	public String getMessage();
}
Msg1.java
上記のIMessageインターフェースを実装しています。
package com.example.test1;

public class Msg1 implements IMessage {
	@Override
	public String getMessage() {
		return "いらっしゃいませ";
	}
}
Msg2.java
上記のIMessageインターフェースを実装しています。
package com.example.test1;

public class Msg2 implements IMessage {
	@Override
	public String getMessage() {
		return "テストです";
	}
}
実行する
| -Dspring.profiles.active=product -Dspring.profiles.active=test |
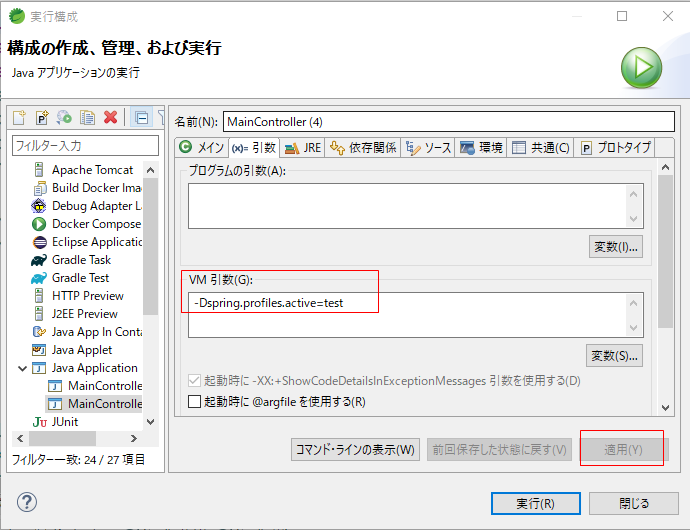
MainController.javaを右クリックして「実行」→「実行の構成」をクリックするとダイアログが表示されます。
VM引数に上記のどちらか(-Dspring.profiles.active=xxx)を入力します。
値をproductにするとMsg1が、testにするとMsg2が対象になります。
pom.xml
設定したライブラリです。
	<!-- https://mvnrepository.com/artifact/org.springframework/spring-beans -->
	<dependency>
		<groupId>org.springframework</groupId>
		<artifactId>spring-beans</artifactId>
		<version>5.3.7</version>
	</dependency>
	<!-- https://mvnrepository.com/artifact/org.springframework/spring-context -->
	<dependency>
		<groupId>org.springframework</groupId>
		<artifactId>spring-context</artifactId>
		<version>5.3.7</version>
	</dependency>
関連の記事