SpringBootのWebSocketで値を送受信するサンプルです。
(確認環境:Spring Boot 2.5,JDK 11)
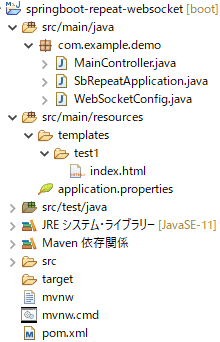
目次
| サンプル | WebSocketで値を送受信する |
| コントローラ(MainController.java) | |
| WebSocket設定ファイル(WebSocketConfig.java) | |
| 画面(index.html) | |
| 設定ファイル(application.properties) | |
| pom.xml |
WebSocketで値を送受信する
流れは、以下のとおりです。
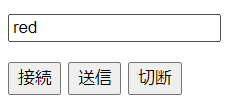
1.複数のブラウザのタブを開き、それぞれの画面で接続ボタンを押して接続します。
次に1つの画面でテキストボックスに値を入力して送信ボタンをクリックします。
2.コントローラを経由して入力した値が複数のブラウザのコンソールにログが表示されます。
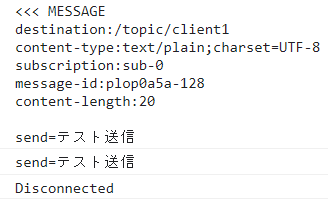
3.切断ボタンを押して切断します。
http://localhost:8765/test1でアクセスします。
githubにコードがあります。
https://github.com/ut23405/springboot/tree/master/springboot-websocket
コントローラ(MainController.java)
package com.example.demo;
import org.springframework.beans.factory.annotation.Autowired;
import org.springframework.messaging.handler.annotation.MessageMapping;
import org.springframework.messaging.handler.annotation.Payload;
import org.springframework.messaging.simp.SimpMessagingTemplate;
import org.springframework.stereotype.Controller;
import org.springframework.web.bind.annotation.GetMapping;

@Controller
public class MainController {
    @Autowired
    private SimpMessagingTemplate template;

	@MessageMapping("/web1")
	public void send1(@Payload String message) {
		template.convertAndSend("/topic/client1", "send=" + message);
	}

	@GetMapping("/test1")
    public String input1() {
        return "test1/index";
    }
}
15行目のmessageは、クライアントから送信された値を受信します。
16行目は、クライアントに値を送信します。
以下は、convertAndSendメソッドのリンクです。
https://spring.pleiades.io/spring-framework/docs/current/javadoc-api/org/springframework/messaging/core/AbstractMessageSendingTemplate.html#convertAndSend-D-java.lang.Object-
WebSocket設定ファイル(WebSocketConfig.java)
package com.example.demo;

import org.springframework.context.annotation.Configuration;
import org.springframework.messaging.simp.config.MessageBrokerRegistry;
import org.springframework.web.socket.config.annotation.EnableWebSocketMessageBroker;
import org.springframework.web.socket.config.annotation.StompEndpointRegistry;
import org.springframework.web.socket.config.annotation.WebSocketMessageBrokerConfigurer;

@Configuration
@EnableWebSocketMessageBroker
public class WebSocketConfig implements WebSocketMessageBrokerConfigurer
{
    @Override
    public void configureMessageBroker(MessageBrokerRegistry config) {
        config.enableSimpleBroker("/topic");
        config.setApplicationDestinationPrefixes("/app");
    }

    @Override
    public void registerStompEndpoints(StompEndpointRegistry registry) {
        registry
        .addEndpoint("/point1")
        .withSockJS();
    }
}
15行目の/topicは、サーバからクライアントへの送信時に使用します。使用時はtopic/client1を設定します。client1はクライアントのjsに記載されています。
16行目の/appは、クライアントからサーバへの送信時に使用します。使用時は/app/web1を設定します。web1はコントローラにあります。
22行目の/point1は、クライアントからサーバへの接続時に指定します。
画面(index.html)
<!DOCTYPE html>
<html xmlns:th="http://www.thymeleaf.org">

<head>
	<meta charset="utf-8" />
	<title>test</title>
</head>

<body>
	<p><input type="text" value="red" id="text1" maxlength="5" /></p>
	<input type="button" value="接続" onclick="clickBtn1()">
	<input type="button" value="送信" onclick="clickBtn2()">
	<input type="button" value="切断" onclick="clickBtn3()">
	<script src="/webjars/sockjs-client/sockjs.min.js"></script>
	<script src="/webjars/stomp-websocket/stomp.min.js"></script>
	<script>
		let stompClient = null;
		function clickBtn1() {
			const socket = new SockJS('/point1');
			stompClient = Stomp.over(socket);
			stompClient.connect({}, function (frame) {
				//コールバック関数
				stompClient.subscribe('/topic/client1', function (result) {
					console.log(result.body);
				});
			});
		}
		function clickBtn2() {
			const msg1 = document.getElementById("text1").value;
			stompClient.send('/app/web1', {}, msg1);
		}
		function clickBtn3() {
			if (stompClient !== null) {
				stompClient.disconnect();
				stompClient = null;
			}
			console.log("Disconnected");
		}
	</script>
</body>
</html>
19行目のpoint1は、接続時に必要です。
23行目の/topic/client1は、サーバからの受信先です。
コールバック関数の引数のresultにはサーバから受信した値が入ります。
24行目はresult.bodyで値をコンソールに表示します。
30行目の/app/web1は、サーバへの送信先です。
設定ファイル(application.properties)
server.port = 8765ポート番号を変更しています。
pom.xml
画面のボタンを押すとファイルがダウンロードされます。
		<dependency>
			<groupId>org.springframework.boot</groupId>
			<artifactId>spring-boot-starter-thymeleaf</artifactId>
		</dependency>
		<dependency>
			<groupId>org.springframework.boot</groupId>
			<artifactId>spring-boot-starter-web</artifactId>
		</dependency>
		<dependency>
			<groupId>org.springframework.boot</groupId>
			<artifactId>spring-boot-starter-websocket</artifactId>
		</dependency>
		<dependency>
			<groupId>org.springframework.boot</groupId>
			<artifactId>spring-boot-starter-test</artifactId>
			<scope>test</scope>
		</dependency>
		<dependency>
			<groupId>org.webjars</groupId>
			<artifactId>webjars-locator-core</artifactId>
		</dependency>
		<dependency>
			<groupId>org.webjars</groupId>
			<artifactId>sockjs-client</artifactId>
			<version>1.0.2</version>
		</dependency>
		<dependency>
			<groupId>org.webjars</groupId>
			<artifactId>stomp-websocket</artifactId>
			<version>2.3.3</version>
		</dependency>
		<dependency>
			<groupId>org.springframework.boot</groupId>
			<artifactId>spring-boot-devtools</artifactId>
			<optional>true</optional>
		</dependency>
参考
https://spring.pleiades.io/guides/gs/messaging-stomp-websocket/
関連の記事