SpringBootとSpring batchで定期処理を行うサンプルです。
(確認環境:Spring Boot 2.5,JDK 11)
目次
| サンプル | 定期処理の流れ / @EnableSchedulingを記述(SbRepeatApplication.java) |
| 前回処理の開始時点を元に処理を開始(fixedRate) | |
| 前回処理の終了時点を元に処理を開始(fixedDelay) | |
| 初回の処理が始まるまでの時間(initialDelay) | |
| cron形式で指定 |
定期処理の流れ
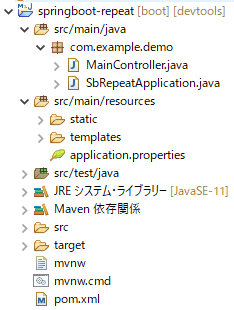
作成するファイル

SbRepeatApplication.javaに@EnableSchedulingを追加します。
定期処理は、MainController.javaに記述しています。
cron形式の設定ではapplication.propertiesに記述しています。
githubにコードがあります。
https://github.com/ut23405/springboot/tree/master/springboot-repeat
@EnableSchedulingを記述(SbRepeatApplication.java)
SpringApplicationを開始するファイルに@EnableSchedulingアノテーションを追加します。
package com.example.demo;

import org.springframework.boot.SpringApplication;
import org.springframework.boot.autoconfigure.SpringBootApplication;
import org.springframework.scheduling.annotation.EnableScheduling;

@SpringBootApplication
@EnableScheduling
public class SbRepeatApplication {

	public static void main(String[] args) {
		SpringApplication.run(SbRepeatApplication.class, args);
	}

}
前回処理の開始時点を元に処理を開始(fixedRate)
MainController.java
package com.example.demo;

import org.springframework.scheduling.annotation.Scheduled;
import org.springframework.stereotype.Component;

@Component
public class MainController {
	@Scheduled(fixedRate = 3000)
	public void output1() {
		System.out.println("こんにちは");
	}
}
前回処理の開始時点を元に3秒ごとに文字列が出力されていきます。3000はミリ秒で3秒です。
前回処理の終了時点を元に処理を開始(fixedDelay)
MainController.java
package com.example.demo;

import org.springframework.scheduling.annotation.Scheduled;
import org.springframework.stereotype.Component;

@Component
public class MainController {
	@Scheduled(fixedDelay = 3000)
	public void output1() {
		System.out.println("こんにちは");
	}
}
前回処理の終了時点を元に3秒ごとに文字列が出力されていきます。3000はミリ秒で3秒です。
初回の処理が始まるまでの時間(initialDelay)
MainController.java
package com.example.demo;

import org.springframework.scheduling.annotation.Scheduled;
import org.springframework.stereotype.Component;

@Component
public class MainController {
	@Scheduled(initialDelay = 3000, fixedDelay = 4000)
	public void output1() {
		System.out.println("こんにちは");
	}
}
initialDelayは初回の処理が始まるまでの時間です。3000はミリ秒で3秒です。
cron形式で指定
MainController.java
package com.example.demo;

import org.springframework.scheduling.annotation.Scheduled;
import org.springframework.stereotype.Component;

@Component
public class MainController {
	@Scheduled(cron = "${schedule.cron1}")
	public void output1() {
		System.out.println("こんにちは");
	}
}
application.properties
server.port = 8765
schedule.cron1 = */3 * * * * *
schedule.cron2 = */5 * * * * *
上記のcron1は3秒ごとに実行されます。スラッシュ(/)をつけるとその間隔で実行されます。
application.ymlの場合
server:
  port: 8765
schedule:
  cron1: "*/3 * * * * *"
  cron2: "*/5 * * * * *"
cronの設定値
cronの設定値は、以下のとおりです。
| 秒(0-59) | 分(0-59) | 時(0-23) | 日(1-31) | 月(1-12) | 曜日(0-7) |
schedule.cron1 = 0 0 15 * * *上記は、毎日15時に実行します。
範囲指定(1-3)、カンマ区切りでの指定(1,2,3)、繰り返しの指定(*/1)(例:1分毎)もできます。
曜日の指定
曜日は、数値または英字の指定ができます。日曜日(sun)は0または7です。
| 0 | 1 | 2 | 3 | 4 | 5 | 6 | 7 |
| sun | mon | tue | wed | thu | fri | sat | sun |
schedule.cron1 = 0 0 15 * * mon-wed上記は、月から水曜日の15時に実行します。ハイフン(-)をつけるとその間実行されます。
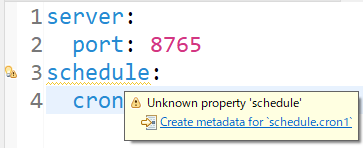
ymlファイルの警告
ymlファイルで警告が出る場合は、カーソルを当ててCreate metadata~をクリックします。

以下は、SpringのScheduledアノテーションのリンクです。
https://spring.pleiades.io/spring-framework/docs/current/javadoc-api/org/springframework/scheduling/annotation/Scheduled.html
以下は、Springのcronの指定の詳細のリンクです。
https://spring.pleiades.io/spring-framework/docs/current/javadoc-api/org/springframework/scheduling/support/CronExpression.html#parse-java.lang.String-
関連の記事
